Image Optimizers and Optimizing Images for Best Results
This post was last updated on May 7th, 2019
“I work with a lot of images all the time. I edit them and make sure they are enhanced to look good. Now, I want to learn more about image optimizers and optimizing images for the World Wide Web. And of course, I want to also know more about optimizing images for better performance. Can you help me know more about all of these?”
~Anonymous Graphics Designer
Part I: Introduction
Believe this statement: You wouldn’t want to be in a position where search engines like Google, Yahoo!, and Bing hates your personal or business website. Search engines like websites that are very speedy and put them at a higher position in search engine rankings compared to slower websites.
That’s why you can actually optimize your images and reduce its file size in order to enhance the performance and speed of your website. But the problem with optimizing and formatting these images is that it often leads to diminished quality. Which, can lead to visitors seeing your website as poorly built and instantly decreases your credibility? This is not bad though, as long as you make sure the images don’t really look ugly to scare website visitors away.
However, there are tricks you can actually implement in order to reduce the size of an image while still maintaining a decent quality enough to be displayed within a website. Now, let’s take a look at how to optimize your images without reducing its quality to being poor. Plus, we will dive into how to actually optimize images for performance and the World Wide Web.
What do you mean when you say you optimize images? Large images take up more memory to load that’s why it leads to slowing down of devices displaying it. This goes the same for web pages who use an insanely huge size of images. Large sized images which load slow leads to poor user experience.
The process of optimization of images involves the reduction of the images’ file size by utilizing a script or plugin. This leads to improved speed when it comes to loading a particular page. The two methods usually used for optimizing images is lossy and lossless compression.
Part II: Advantages of Formatting and Optimizing Your Images
So, what are the reasons why you need to have your images formatted and optimized? What are the specific benefits that you can get from it? Well, there are a lot of advantages when it comes to optimizing images especially for performance.
As of 2017 of December, HTTP Archive stated that images comprise an average of 54% of the total weight of a website. That’s why if you want to optimize your website, you must start with the images. These image files have an important part to play along with fonts and scripts. Plus, optimizing your images is actually easy to execute. However, a lot web owners and developers overlook this area of optimization.
Below are the main benefits you can get from formatting and optimizing your images:
01 – The loading speed of your pages will be much faster. If your page loading speeds is too slow, your visitors are more likely to hit the back button and move to a competing website.
02 – If you optimize images and use an SEO plugin in combination with it, your search engine optimization will be enhanced. Thus, your site will rank higher in search engine page results. Search engines like Google will be able to crawl your images and index it faster for the image search feature.
03 – Of course, when you want to create backups of your images, it will always be faster.
04 – Since your images will have smaller reduced sizes, images will take less bandwidth in order to load.
05 – Images would use only less storage space within your web server.
Part III: Optimizing Images for Enhanced Performance And For The Web
The main goal of optimizing your image is to find the perfect balance between a reduced file size and a decent image quality. There are multiple ways to perform optimizations of your images.
The most common way of doing it is to compress the photos before you actually upload them within your site. Usually, this can be done with a tool such as Adobe Photoshop or FoneDog’s Photo Compressor. Some of the optimization tasks can be done by using plugins as well.
When optimizing your images, the two main things you should take into consideration are compression type you have to use and the format of the file. When you select the proper combination of type of compression and file format, the size of the image can be reduced significantly even by a factor of 5. The best thing you can actually do is to experiment with the images and the file formats in order to find out which produce the best results.
Selecting the Right Format for Your File
Before you actually begin to modify the images you wish, you have to select the best file format. You can choose from some file types you can actually use:
- PNG – This type of file results in images that are of higher quality. But, the downside is, it results in files with larger sizes. It was first made as an image format that is lossless. However, PNG files can be lossy as well.
- JPEG – Utilizes both lossless and lossy optimization. With this type of file, you can adjust the level of quality in order to balance out file size and image quality.
- GIF – It utilizes 256 colors and lossless compression only. It is best used for images that are animated.
There are other file types including WebP and JPEG XR but these types are not supported universally by most browsers. It is ideal to use JPEG for images that contain a huge number of colors. PNG is best for images that are simple.
Size VS. Compression Quality
The lower the compression rate, the higher the quality of the image. This means, the file size becomes larger as well. The best practice is to keep a webpage’s size within a range of 1 to 2 megabytes (MB) in size. What you should actually do is to find a balance among quality, compression rate, and size of the file. To get the best performance possible, it is best to have PNG image that are equal to or less than 100KB in size.
Lossless VS. Lossy Optimization
You should also take note of the fact that you can use two different compression types. These are called lossless and lossy compression. Lossy compression results in the elimination of some of the data. This results in the lowering of the quality of the image. But you have to be cautious on the rate of image compression you would like to implement.
Lossless Compression is a type of filter wherein data is compressed. It doesn’t lead to the reduction of the quality of the image. However, it is necessary for uncompression of images before these images can actually be rendered.
For the best results, you can experiment with these two compression techniques to be able to check out which type works best for every format or image you have. Tools such as Adobe Photoshop allow you to save images for the World Wide Web. Sometimes, you can even make adjustments so you can select the best compression rate without compromising much of the quality of the image.
Part IV: Best Practices
Below are some best practices you can implement especially when optimizing images:
01 – When choosing a specific WordPress plugin, you should utilize one that optimizes and compresses images on their own servers (externally). This leads to the reduction of load within your own website.
02 – If possible, you should utilize vector images in combination with your JPEG and PNG images.
03 – Utilize a Content Delivery Network (CDN) in order to ensure that your images load faster for visitors all around the world.
04 – Remove image data that are unnecessary.
05 – Remove the white space by cropping it. SImply recreate by utilizing CSS for the provision of padding.
06 – If possible, use effects of CSS3.
07 – When you save images, make sure you use proper dimensions.
08 – Utilize web fonts in place of text imposed within images. The web fonts actually looks better especially when they are scaled. Plus, they use less space.
09 – Raster images should only be used for scenes that contain a huge amount of details and shapes.
10 – It is best to implement the reduction of bit-depth towards a color palette that is smaller.
11 – It is best to use lossy compression as much as possible.
12 – It is best to experiment to see which is the setting best suited for each type of format.
13 – If animation is necessary, utilize GIFs. Compress these GIFs if possible.
14 – If you need images that has a high resolution and a high amount of detail, utilize PNG.
15 – JPEG is used mostly for screenshots and general photos.
16 – Remove all unnecessary image metadata.
17 – Ensure that the process is actually automated.
18 – Sometimes, you need to have images lazy loaded in order to have a faster first-page rendering.
19 – When you save images using Photoshop or other tools, save them in the option that states “Save For Web.”
Part V: Image Optimizer Tool
The image compressor tool that we recommend for you to compress images is FoneDog’s Free Online Photo Compressor. The said tool has the following advantages:
- It allows you to compress image files (e.g. JPEG or PNG) which will result to a reduction in size without losing much of the image’s quality.
- It allows you to save more space on your device. Thus, you can use this space for other photos, videos, and important documents.
- It results in the image using less bandwidth especially if you want to use it inside a website. Thus, you can save a lot of bandwidth and accommodate more users especially if the web hosting package you availed has a limited amount of data transfer available.
- It results in faster loading times within devices and for web hosting service providers. Users of your website won’t be bored by slow loading times. Because your images take up less space, it will load faster and provide a better user experience.
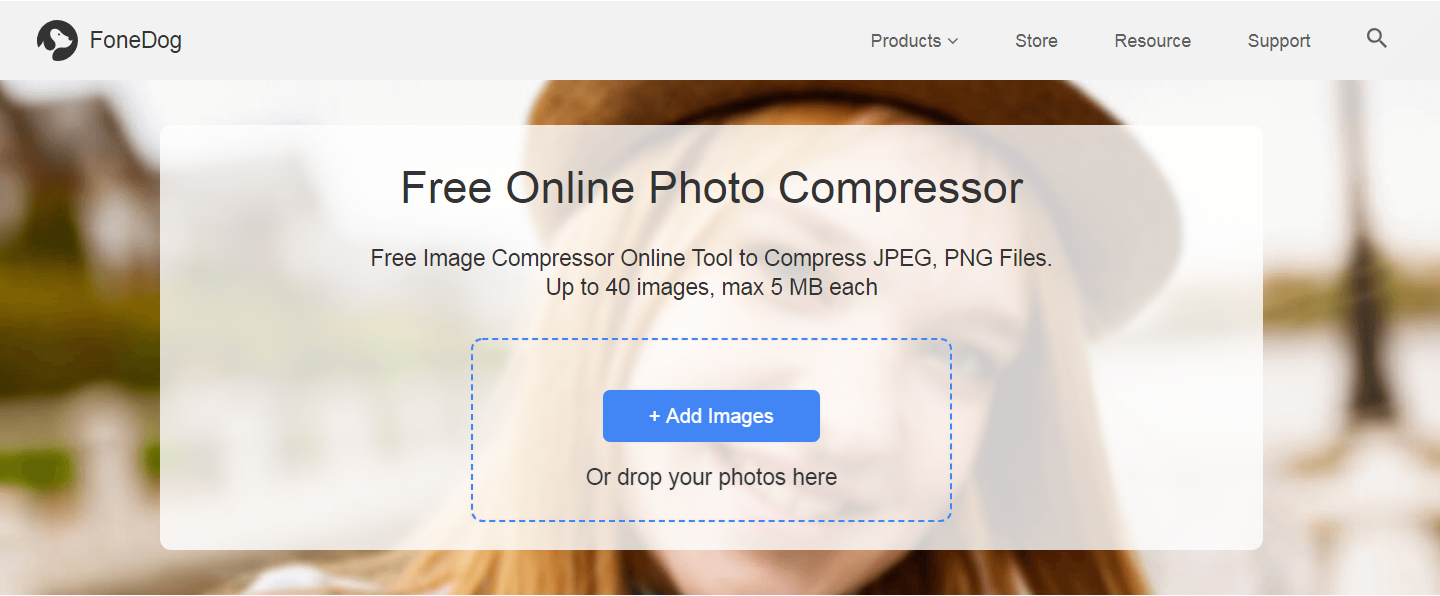
Here’s how to use FoneDog’s Free Online Photo Compressor step-by-step:
Step 01 – Go to the Photo Compressor page in FoneDog’s website www.fonedog.com.
Step 02 – Upload your image or images. You can upload a maximum of 40 images with about 5MB per image in maximum size.
Step 03 – After the photos are compressed, download the compressed image file within the said platform.
Part VI: Conclusion
It is best to optimize images for faster performance and reduced page loading times. You can follow the best practices outlined here to get the best possible optimization for your images. As such, you can use FoneDog’s Free Online Photo Compressor to optimize your images and reduce image size.

Most Inside Editorial Team
MostInside is a trusted publication helping people navigate real decisions across health, finance, career, home, relationships and technology since 2009. Straight to What Matters.


