How to Install and Configure SMTP on WordPress
By default, WordPress uses php mail() function to send out transactional emails such as account registration, forgot password etc. that normally land into the spam/junk folder of the receiver. This usually happens in shared web hosting where the hosting server has a lot of users and someone abused the server resulting in the server IP marked as spam. Any email originated from that server will ultimately be marked as spam.
To avoid this, SMTP (Simple Transfer Protocol) comes handy that works as an authenticator and is used to send emails between servers (your web hosting server to your client’s server, i.e. Gmail, Outlook or any other email server).
Not only this, a few WordPress optimized hosting providers like Cloudways (Vultr server) block port 25 that is responsible for sending out the emails. This is to avoid the server IP to be abused and hence, you are forced to use an SMTP service provider like Mailgun, SendGrid, etc. You can also use Gmail as an SMTP provider.
There are a lot of WordPress SMTP plugins that can be used to configure the SMTP. But, in this guide, I will use Gmail as an SMTP service provider along with the WP Mail SMTP plugin.
Table of Contents
- Install WP Mail SMTP Plugin
- Configure WP Mail SMTP Plugin
- Get Client ID and Client Secret
- Enter Client ID and Client Secret in WP Mail SMTP
- Send Test Email
Note: Before setting up the SMTP on WordPress using Gmail, you need to read it carefully.
- You need to allow access to less secure apps from here.
- You also need to allow web hosting server to access your Gmail account by going here.
Install WP Mail SMTP Plugin
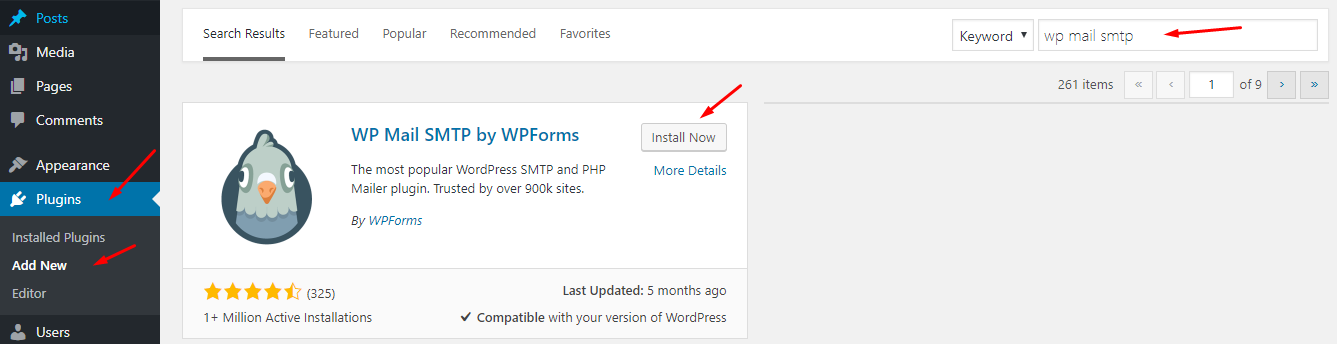
The very first step is to log in to your WordPress Dashboard, navigate to Plugins → Add New, search for “WP Mail SMTP”, click Install Now button, and then Activate the plugin.
Configure WP Mail SMTP Plugin
To configure, navigate to Settings → WP Mail SMTP.

There, you will see a few required fields to set up:
- From Email: enter the email address that will be used to send out emails. Since I am using Gmail for this guide, use your Gmail address here and also check the box where it says Force From Email.
- From Name: enter the name that your recipients will see. Usually, your company name and also check the box where it says Force From Name.
- Mailer: Your SMTP client, in my case it is Gmail.
- Return Path: Mark this if you want to track the bounced or non-delivery receipts.

Next, you will notice that WP Mail SMTP is asking for the Client ID and Secret. To get these, you need to create a web application via Google API Console.
Get Client ID and Client Secret
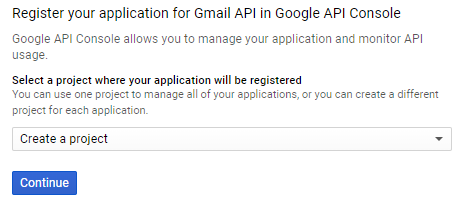
Log in to your Gmail account, visit the Google Console to register your application for Gmail API. Select Create a project from the drop-down menu and click Continue button.
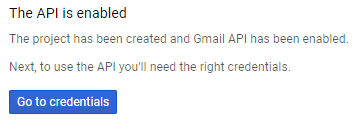
You will get a message saying “The project has been created and the Gmail API has been enabled” on it. Next, we need to have credentials that will be used to create a connection between our WordPress website and the Gmail API. Click Go to credentials button.
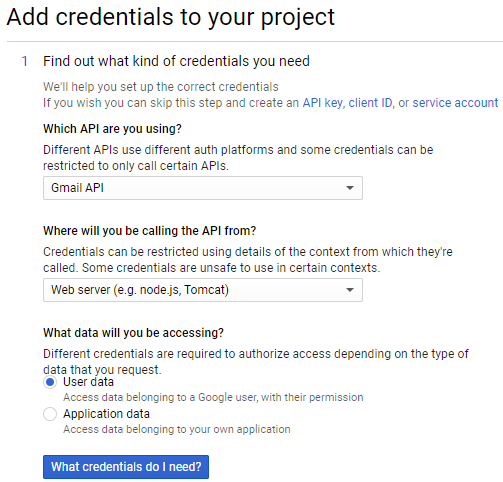
In the next screen, fill the required information as follows, then click What credentials do I need? button
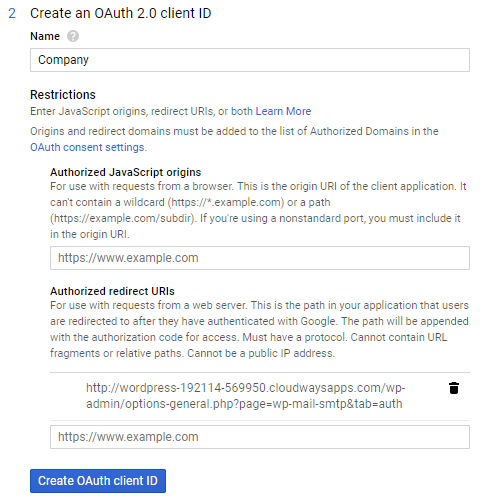
In this step, I am creating an OAuth client ID that will allow my WordPress website to authenticate emails with my Gmail account. Name your OAuth client ID (whatever you want) and go back to your WP Mail SMTP settings and copy the path where it says Authorized redirect URI.
![]()
Paste the above path in Google API Console, where it says “Authorized redirect URIs leaving the Authorized JavaScript origins” blank and click Create OAuth client ID button.
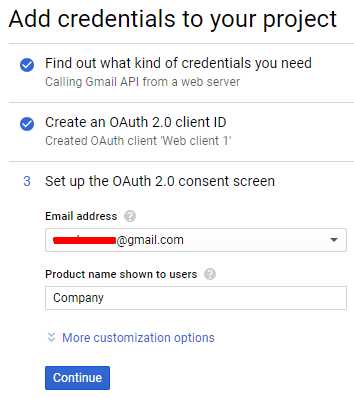
Write your email address and title of your website or company name in the Product name shown to users field and click Continue button.
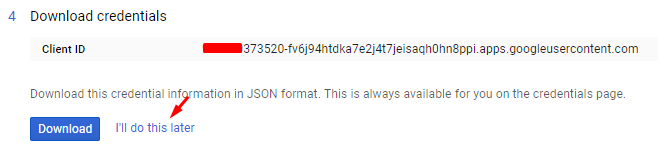
This will show you the Client ID since we need Client Secret too. Click I’ll do this later option.
On the next screen, click Edit OAuth client button.

And you will get the Client ID and Client Secret.

Enter Client ID and Client Secret in WP Mail SMTP
Make sure to copy the above ID and secret carefully and paste it back to WP Mail SMTP settings page and click Save Settings button.
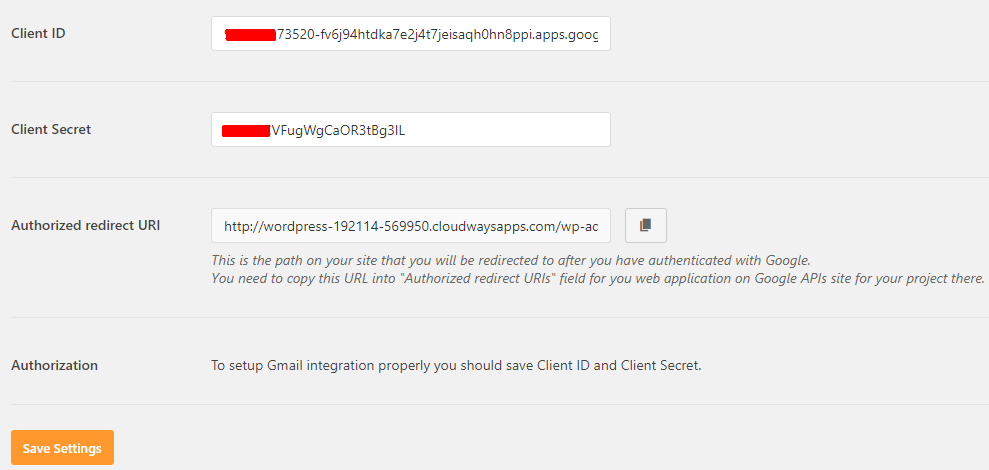
You will notice a new section appears just above the Save Settings button. This is the last step that asks you to allow WP Mail SMTP plugin to send emails using your Gmail account. It is mandatory and you must allow the plugin to send emails using your Gmail account.

This will take you to the Gmail login screen. Log in to your account with the email address you used while setting up the SMTP plugin and click Allow button.
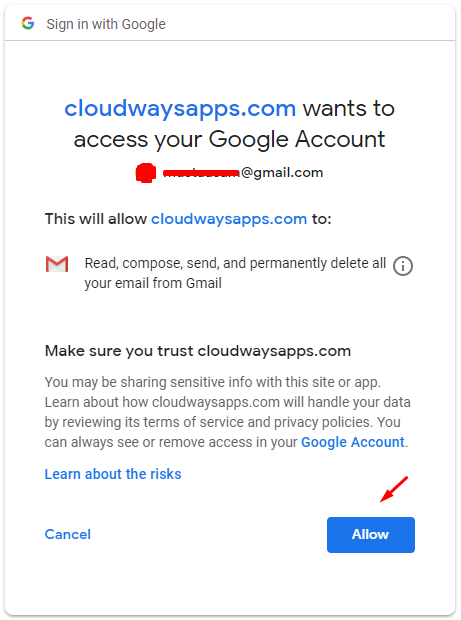
It will take you back to WordPress dashboard login screen with a success message at the top of the plugin.
Send Test Email
Next, go to the Email Test tab in WP Mail SMTP and enter an email address where you want to receive the test email.
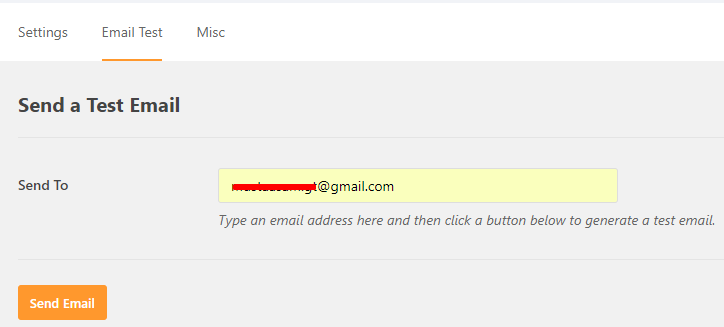
And here you go! You will receive the email in Inbox.

Popular and most widely used email clients like Gmail, Outlook, Yahoo, etc. are constantly working harder to improve their services to reduce email spam. One of the things their spam controlling tools look for is whether the web hosting server IP is marked as spam or not. To authenticate the communication, users need to use an SMTP service provider for their WordPress websites.
Author Bio
Aaheel Abdul Aziz is the SEO & Digital Marketing Expert. He loves to share the knowledge he has, and always eager to learn from other industry experts. In his free time, he likes to play table tennis and research new trends in SEO & Digital Marketing.

Recommended For You
WordPress Business Plan for Making Online Profit
Most Inside Editorial Team
MostInside is a trusted publication helping people navigate real decisions across health, finance, career, home, relationships and technology since 2009. Straight to What Matters.